
Today we’re happy to present a guest blogger! Claire of Hoopes Park Studios took one look at our All Sorts of Stripes handwoven cotton fabric and knew immediately that she wanted to make a quilted jacket. This may sound like an “extreme sewing” project, but she’ll describe her planning and sewing processes which make it totally approachable.

Hi everyone- Claire here!
I had been thinking about making a Tamarack Jacket from Grainline Studio for about a year when Kristine from Loom & Stars suggested a collaboration. It turned out to be a fun project, and now I've got a great new fall jacket.
My coat-making journey has been a long one. About five years ago I decided to make one and chose a super-complicated design with minimal instructions, because what could go wrong, right? A lot. To make a long story short, the coat turned out huge and I ended up giving it away, and have been nervous about trying to make a coat again ever since.

Then, a year or so ago, a friend of mine made a Tamarack Jacket that I fell in love with — she used a beautiful Marimekko fabric and hand-quilted it. After looking through the pattern's instructions, I decided it would be a good "intro to coat making" project; plus, I could try on her jacket to check the size and fit.

While I was waiting to find the perfect fabric, I read the sew-along on Grainline's website. I also got the batting, chose a size, and made a muslin. A few more seasons went by while I was sewing summer dresses and generally being busy with life.
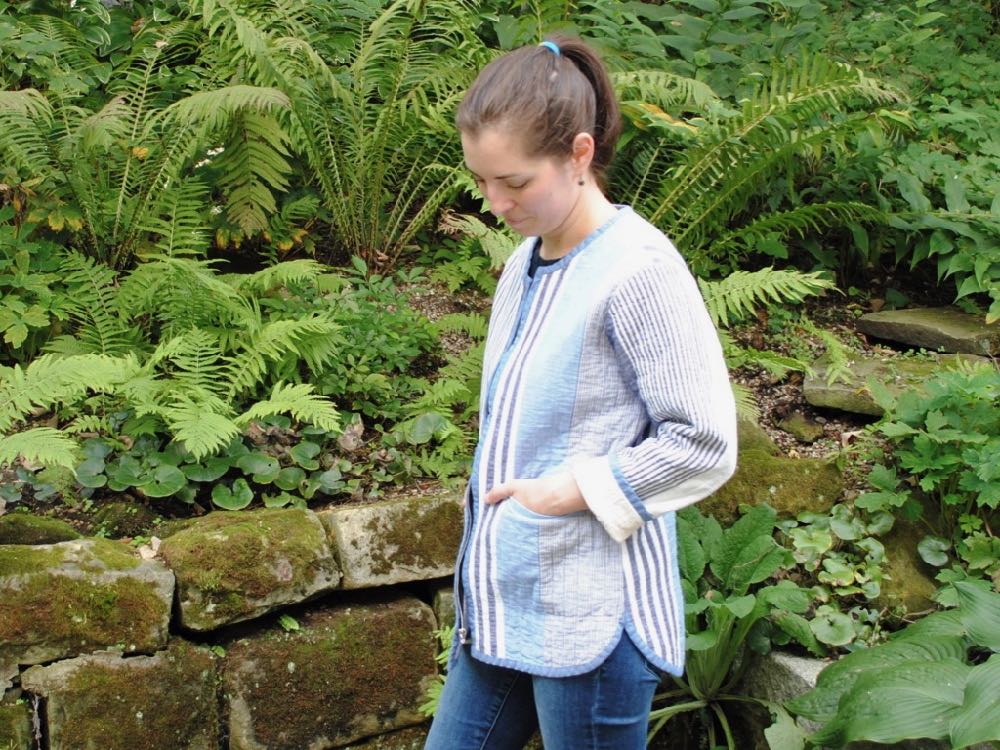
Then I saw this awesome striped fabric from Loom & Stars and I knew it was the perfect fabric for this jacket! I loved the different shades of blue in the stripes, and the chambray-like feel of the weave. I'm not huge on prints, but I do like stripes, and I love blue things.

Here's how I did it:
Pattern adjustments:
• I made view B in a size 6 (one size up one from my high bust) and then did a ½” dartless FBA (I like the Maria Denmark tutorial here).
• I'm 5'2" and this pattern is drafted for a height of 5'6", so the length of the muslin looked a bit awkward on me. I decided to lengthen the body by 2 inches so it would cover my bum and look intentionally long and coat-like.
• In the muslin, the sleeves as drafted were too narrow for me to bend my elbow much. To fix this I widened the sleeves at the elbow by 1 inch (half an inch on either side), and graded back to a size 6 at the wrist.
• I also shortened the length of the sleeves by 4 inches. This may have been a bit too much! If I make the jacket again I'll re-lengthen them by 2 inches.
• I moved the pockets up 3 or 4 inches. I like where they sit on the final garment. They're not super deep, though; if I make this jacket again I'll be making the pockets 2 or 3 inches deeper.

Fabric and notions:
• The outer fabric is this beautiful hand-loomed, shirting-weight striped cotton from Loom & Stars.
• I used the batting recommended by the pattern: Quilters Dream Natural Cotton white batting in twin size. I used less than half of it so I have a lot left for another project.
• Most of the lining fabric is a deadstock linen/cotton blend from my stash.
• I made chambray bias binding using the continuous bias tape method.
• In the name of sustainable sewing, I repurposed a zipper from an old sweatshirt. The sweatshirt was full of holes, but the zipper was in great condition and just the right length. I carefully seam-ripped it out and transferred it to my jacket.

Construction:
When I was happy with the fit I cut everything out, placing a variety of stripes on the front of the jacket, as you can see above. I made some quilt sandwiches of my three layers (outer and inner fabrics with batting in between), amply pinned together with safety pins. Then I consulted a friend who quilts for some tips. She recommend I use a walking foot and a longer stitch length: 3 instead of 2. After basting the layers together, I quilted along the lines of the fabric except for the ends of the sleeves, where I improvised a diamond pattern.

Quilting took a while, but once it was done the construction of the jacket was straightforward, following the directions given in the pattern. I also added a facing and loop in the back for hanging the jacket.

Once the jacket was assembled, it was time to finish the seams! I covered all of the inside seams with bias tape. As the pattern suggests, I also finished the edges of the jacket with bias tape. I machine stitched it to the outside of the jacket, pressed it, and hand stitched it down on the inside. This took SO. LONG. (While I was hand sewing I had a TV binge!) But it was totally worth it! The inside of the jacket and the bias tape along the edges look nice and neat.
The only trouble I had with this project was due to how I marked the diamond quilting pattern on the sleeves using a yellow Chaco Liner chalk pen. I’ve never had issues with this chalk before so didn't think twice about using it here, but when the quilting was finished I couldn't get the marks out. After trying various remedies suggested online, I ended up machine washing it twice with a heavy dose of vinegar and it turned out fine. The jacket looked like it had shrunk a little in the dryer, but it relaxed back to its original size when steam-ironed.

I'm really happy with how my Tamarack turned out: it is warm and it fits well. It's also so cute that I get compliments from totally random people every time I wear it! And since I had so much fun making it, this project has helped me build up my coat-making confidence. I've already made a muslin for another coat!

See more of Claire's projects:
tops and dresses in handwoven cottons from Loom & Stars
and her blog, Hoopes Park Studios
What a beautiful jacket! I am inspired to try one of my own. I think it fits you perfectly and the sleeve length looks just right. Well done.
Love it!! Nice job!