
Look at this fabulous dress! Doesn’t it make you want to sew? Designed by the great Claire McCardell, it’s still fresh and summery even though it dates from 1946. McCardell more or less invented casual women’s wear in the mid-20th century, and sundresses like this are still an essential part of a summer wardrobe for many women. This one has several nice details, but the way the lower edge of the neckline zig-zags along the diagonal lines of the fabric is especially cool and actually not very hard to sew. I once made a dress with a similar shaped neckline finish and I'll show you how I did it. Our Diagonal Grid hand block print cotton, also shown above, is perfect for recreating the look of McCardell’s dress.

I’m always a proponent of thinking beyond the pattern, and I love to incorporate vintage-style touches into my sewing projects. These came together in the dress shown above, which I made about 15 years ago. My inspiration was the amazing Chanel coat from the 1920s pictured below. The way the coat’s silk lining spills out onto the lapels, where it's carefully cut and stitched around the petals of the floral print, is ingenious. (In fact, though I didn't know it at the time, the neckline of the matching dress is akin to what we're discussing here; see more photos on the Metropolitan Museum of Art’s website, accession no. 1984.31a-c.)

My fabric was cotton voile with an embroidered leaf design which could be used in a similar way. Stitching around some leaves in the neckline would evoke the spirit of Chanel’s design, but more simply. Because the fabric was slightly translucent I made the bodice with an edge-to-edge lining, in which the lining also functions as the facing. The inside and outside of the neckline are shown below.

The dress didn’t need fancy seamlines since it was all about the fabric, so I used a well-fitting sloper to create a basic bodice, with a general idea of where the neckline should fall. Moving the pattern piece around on the fabric, I decided how best to place the neckline with regard to the leaves. We’ll do that now with the diagonal block print fabric to capture the look of the McCardell dress, but using a bodice style similar to my dress above (it’s the same pattern). This example will have a facing instead of being lined to the edge. I’m only sewing the bodice front here, but you’ll see how the construction works so you can adapt the technique to the requirements of your pattern.

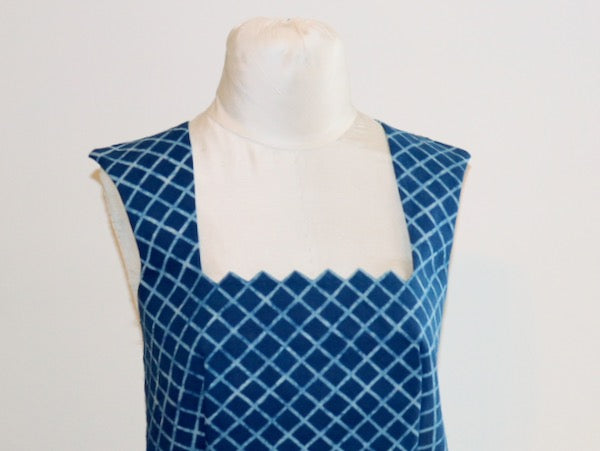
First decide where you want the neckline edge to fall in relation to the fabric design. For this diamond print, should the center of the neckline fall on an upward point of a diamond, or a downward point? Laying out the pattern on the fabric can be a good way to see what looks best. At first I wanted to place an upward point in the middle, as shown above, but that didn’t work well at the corners of the neckline. (The proposed seamline is shown in blue, while the yellow dotted line shows the established vertical part of the neckline. The pin marks the center front line of the bodice, where the pattern piece will be flipped over.)

On the other hand, with the center of the neckline on a downward point, the zig-zags along the lower neckline would meet up with the vertical part of the neckline quite well, making a nicely shaped corner. This is the best solution.

Cut a facing to match and interface it lightly. (I’ve used a different fabric for the facing for the sake of clarity.) Since this is my own pattern, not a professionally-drafted one, I needed to make the facing a little bit smaller than the bodice front. This allows for the turn of the cloth so the facing will not be visible from the outside of the garment. To do this, I cut off about 3/16 inch from the armhole edge of the facing.
Before proceeding, it's always wise to sew a sample when trying a new technique or using a different fabric. In this case, a sample would show me exactly where to stitch along the zig-zag to give the best appearance on the outside of the garment. When the seam is turned right-side out, an interfaced facing can "eat up" more of the outer fabric than one might expect. (And if this were a real sleeveless dress with a center-back zipper, I would have made an all-in-one neckline/armhole facing for the front and back. I would also sew the shoulder seams in order to work with the full neckline of the dress.)

It’s helpful to mark the stitching line on the inside of the garment. I drew it in with yellow chalk, though it's hard to see in the photo. It turned out that the line of zig-zags didn’t quite extend the full width of the neckline. Above, the corner point according to the paper pattern is marked with a pin, while the last downward “point” of the print is about 1/8 inch shy of that, at the right edge of the ruler. No problem; using the ruler, I drew a stitching line up the vertical part of the neckline from the new corner, merging it into the original 5/8 inch seam allowance a few inches above.

With bodice and facing pieces right sides together and the bodice piece on top, carefully stitch the neckline seam, following the marked line. Use a very small stitch length for strength and accuracy. Pivot at the corners and each point, leaving the needle in the fabric. Then sew the rest of the neckline, and sew the facing seams at the armhole edges if necessary.

Here it is stitched, pressed and ready to trim.

Trim the seam allowances of the neckline and armholes. Clip carefully at the inner points, using the tip of the scissors to cut right up to the stitching line, but not through the stitches!

Sometimes it’s tempting to trim too much on shaped seams like this. The book Shirtmaking by David Page Coffin has a great trick for trimming enclosed corners, such as collars and cuffs. It's contrary to much of what we learn about reducing bulk in sewing, but very effective. Don’t cut off the seam allowance across top of the point. Instead, put your finger into the point between garment and facing, fold in the seam allowance on one side of the point, then the other, and pinch these firmly. Then turn, and... voila! A neat corner. Try it!

This is the inside view before pressing. The corners already look pretty good, right? Below, see the finished neckline. It looks great, with nice sharp corners, and it definitely captures the spirit of the McCardell design.

When designing my sewing projects, I like to mix things up by playing with the grain of the fabric. This can elevate a design from ho-hum to eye-catching, as McCardell’s dress shows. On her dress, the midriff section and straps are cut on the bias, which with that fabric turns the diamonds into squares (that is, presuming that the upper bodice and skirt are cut on the straight grain of a diagonal print). The dress wouldn’t be nearly as much fun if the fabric was all cut in the same direction, or if it had a plain neckline, would it? Details like these are totally inspiring and can be easy to recreate, with a little forethought and careful stitching.
You nailed the look! My friend sent me this link after I wrote my own blog post about Tory Burch’s inspiration from Claire McCardell. Proceeding to read your other posts. :)