
Long ago in a project article I promised to show you how to make what I think of as the “Ingenious Indian Pocket”, so called because I first encountered it on my husband’s kurtas. Some readers have been asking about it, so here at last is a tutorial!

The kurta is a traditional shirt-like tunic frequently worn in India and other parts of South Asia. It usually has these clever side-seam pockets centered behind a pocket opening and stitched to the garment around four sides, with a free-hanging pocket bag. The stitching is visible from the outside of the garment but usually isn’t particularly noticeable, though it can have a sporty or decorative look. (Notice how the pocket lines are all slightly curved on my husband’s garments, not to mention beautifully stitched by hand; left and center in the photo below.)

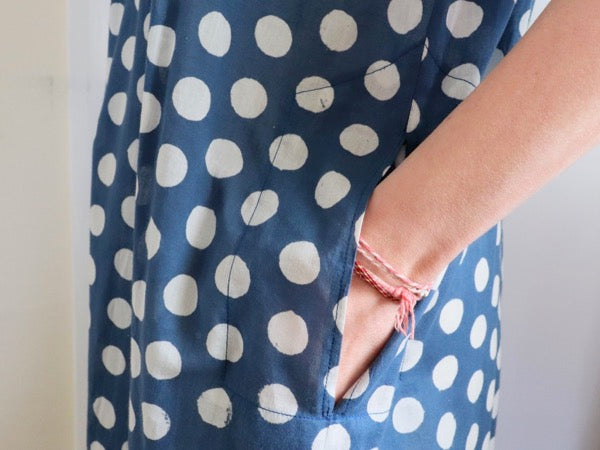
The advantages of this type of pocket, for me, are that it offers a great deal of support and that it’s flat! Yet it doesn't become a focal point on a garment, unlike a patch pocket. Those droopy teardrop-shaped pocket bags that we usually get in women’s clothes can be a nuisance, flapping around inside one's dress and pulling on the side seams. If you agree, you might want to give this Ingenious Pocket a try next time you make a dress or tunic with straight side seams.
I learned how to make these pockets from looking at our own garments and from the Folkwear pattern “Jewels of India”, which has a great kurta pattern for both men and women (it also has a women’s kameez, which I’ll write about soon). To help you understand the assembly method I’ll use different fabrics for the pocket (one of our handloom cottons) and the garment (a block print), and contrasting thread on the outside of the pocket.
The pocket piece should look something like what you see below. As you draft it, think of it in two parts: the upper pocket (sewn onto the garment behind the pocket opening) and the pocket bag (which will be folded in half and hang free below the pocket opening). You don't really need to make a paper pattern piece for the pocket; you can just draw the lines onto your fabric with chalk.

First decide the dimensions of your pocket and its depth. (Will you carry your phone in there?) The width is usually about 5 or 6 inches, and the pocket bag might be 6 or 7 inches deep. The length of the upper pocket depends on the size of the pocket opening on the garment: I make the openings about 6 inches long on my dresses and 7 inches on my husband’s kurtas.
To calculate the length of your pocket piece:
(2 x pocket bag depth) + length of pocket opening
For the sample shown here, this is (2 x 5) + 6 = 16 inches
Draw a rectangle that many inches long by your desired width (here, 5 inches), then add a little triangle at the end of the upper pocket portion. (This extra length provides some ease and looks cool, too!) Add seam allowances on all four sides: half an inch is plenty. Now cut out your pocket, marking each end of the pocket bag with a tiny notch or snip in the seam allowance (shown in red on photo above). Note the yellow dashed line at what will become the top of the pocket bag: this seam will be sewn onto the garment first, just below the bottom of the pocket opening.
To prepare your garment, first decide where you want your pocket opening to be located: probably centered somewhere near your waistline. (Remember that the pocket bag will fall below this.) If you want to reinforce the pocket opening with a bit of stay tape or light interfacing, do that now.

Mark the opening on your garment, then stitch the side seams above and below the opening however you like. Clip the seam allowances at either end, if necessary, so you can press them flat around the pocket opening. Then hem the edges of the opening in some way, making sure it looks tidy on the outside of the garment. I usually just make a plain 1/4 inch turned hem.

Next, prepare the pocket: fold up the pocket bag, matching the notches at each end of it, then stitch the side seams of the bag below the notches.

Turn those seams into the pocket bag and press flat. Then fold down the seam allowance at what is now the top of the pocket bag (the yellow dashed line in the photo of the pattern piece, and above) and press.

Last, fold in the seam allowances all around the upper pocket and press them flat, too (above). The pocket is now ready to attach to your garment.

On the garment, mark or baste a line at the bottom of the pocket opening, perpendicular to the side seam and at least as wide as the prepared pocket, as shown previously in the photo of the pocket opening. This is where you will attach the pocket bag. With the pocket centered over the side seam, flip up the pocket bag and align the top of it (i.e. the notches and the yellow dashed line) on the basted line inside the garment and pin it in place. Then smooth the upper pocket over the opening in the garment's side seam.

The pocket should lay flat on the garment, and the pocket seam allowances should not be visible (they're facing the inside of the garment). Baste the pocket in place around the sides and top of the upper portion, above the pocket bag notches.

Fold up the pocket bag again and baste the pinned top edge of the pocket bag (that yellow dashed line again) onto the line marked on the garment. Now carefully stitch this seam as shown above, making sure not to catch the rest of the pocket by accident.

Once that seam is done, flip the pocket bag back down and stitch all around the basted upper pocket. You can stitch from the inside or the outside of the garment, or even stitch it by hand. Here I'm stitching it from the outside, following the basted lines, and I pivoted around the top of the triangle right on the side seam.

Check the stitching from the outside of the garment to be sure it’s tidy, then remove the basting. You’re finished! Your pocket should resemble the one on the dress below. Admire your handiwork and the way the pocket bag hangs freely yet securely. Wear and enjoy!

I"ve just found this post and am quite excited to try this. I thrifted a kurta last week for the beautiful fabric and so curious about the pocket. I love that it sits so flat on the inside of the garment. Thank you for sharing your time and expertise.
Omg thank you! I just found your website and this tutorial is very timely as my favorite kurta, now over 20 years old, is finally so threadworn I cannot even wear it as a nighty. I was studying the pockets and trying to figure out how to replicate them but now I don’t have to!!
Your fabrics are beautiful and the blog is inspiring as I sit on all my mother’s exquisite cotton saris from Bombay in the 50s. Maybe I will finally screw up the courage to sew one of them up!!
Truly ingeious! I don’t know how many time my phone has dropped out of in-seam pockets that are too shallow and open at the seam. Trying to lengthen them is an exercise in futility. This method will solve that. Thank you!
I’ve just seen this and it is ingenious, I will be incorporating it into my next project
Like fact I can reinforce pocket.
Thank you. 🙏