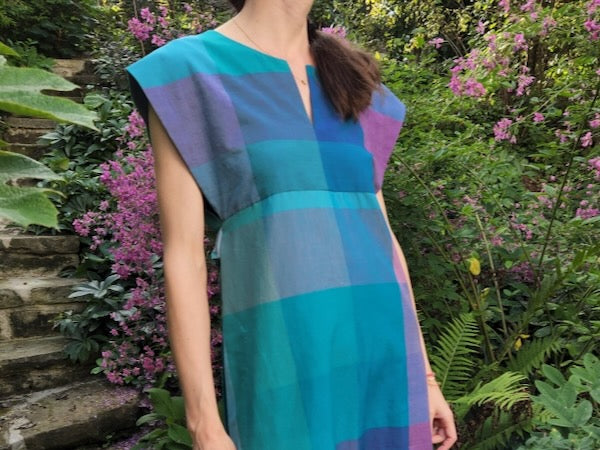

What usually inspires you to sew — fabric or pattern? For me, as a textile lover, it’s nearly always the fabric. But when I first saw the Damn Good Dress Pattern from Forest and Thread, I knew I wanted to make it. The pattern lingered in my mind until the right fabric came around: our Rainbow Check handloom cotton. With its long lines, simple shape, and great style, the Damn Good Dress looked like the perfect way to show off this fabric in all its polychromatic splendor.

The printed paper pattern from Forest and Thread came in a suitably colorful envelope. The instructions are thorough and provide very helpful information on the finished garment’s fit. Due to the generous ease, I chose a smaller size and also made several modifications. Here’s what I did:
- lengthened the bodice 3/4 inch
- shortened the dress about 3 inches, plus another inch or so when hemming
- lowered the neckline about 1 inch all around
- changed the bodice construction slightly as described below
- added pockets

Construction Details:
This pattern is well designed and has a very clever bodice construction that fully encloses all edges. The dress can be completely sewn by machine with beautiful finishing details. However, that involves a lot of topstitching, and I found that I didn’t like the look of topstitching on this fabric. The colors change so often that it was hard to choose an appropriate thread color. Instead I decided to hand-stitch the pockets (more about that later) and most of the hems, changing thread colors as necessary.

Because I wanted to avoid topstitching, I had to change how the bodice was attached to the skirt front. The instructions called for the skirt front to be stitched to the bodice lining before the outer bodice is topstitched in place from the outside, enclosing the waistline seam. I opted for a more traditional construction, attaching the outer bodice to the skirt front by machine, then finishing the lining by hand on the inside. This way there was no stitching visible from the outside. I did the same for the seam joining the shoulder yoke to the bodice back.
Because there is always a little strain at a clipped seamline like the one at the bodice front, I reinforced that area and the curved neckline seam with some fusible interfacing.

I took my time matching the checks on the center front of the dress bodice. When working with handloom fabrics, be aware that it’s not possible to match all the checks down a long seam, like the sides of this dress, because machine-like perfection is not in the nature of these fabrics. The weft threads are beaten in by hand, as you can see in the video here. Slight variations in the weave are part of the beauty of hand craftsmanship. Just match where it matters the most — usually near your face or right on the front of the dress like this.

Another tip for working with handlooms: do you need to trim that enclosed corner? With lightweight or loosely woven fabrics like this, the answer is no. There really won’t be any bulk at the enclosed edge. And if you trim too much you may weaken the seam allowance and risk the fabric unravelling over time. Instead, fold the corners neatly on the seam allowance, pinch tightly, and flip over your finger as shown in this tutorial.

The pattern instructions suggest pressing the enclosed bodice seams flat, right on the folded edge. Because my fabric had different colors on the lining and outer bodice, I wanted to favor the outside of the garment and make the lining less visible. Rolling the seams toward the inside makes them less conspicuous. There are various ways of going about this, the end result being that the lining is in effect slightly smaller than the outer bodice.
I trimmed the edges of the lining a little before sewing the side seams, taking advantage of the turn-of-the-cloth so the seams will naturally fall towards the inside of the garment. Here's a view of the inside: you can just barely see the darker colors of the outer bodice around all the edges, which means that you don't see the lining from the outside of the dress.

One last detail: when the dress was finished, I added bar tacks inside the neckline, at the top of the side slits, and at both ends of the pocket openings, to reinforce all these weak points.

Pockets, Please:
Pockets are a necessity for me, so I added “Ingenious Pockets” at the side seams. Read about this technique, inspired by traditional Indian clothing, in our tutorial here. The resulting pockets are sleek and don’t flap around inside the dress. I placed them so the pocket bag would end just above the side slits of the skirt.

Initially I inserted the pockets completely by machine, and even made a mini-tutorial video (three hours’ work in 90 seconds!).
The dress was then nearly finished so I tried it on. Unfortunately I found that I didn’t like the way the colors flowed from the bodice into the skirt. It would look better if I just flipped over the front skirt panel — luckily the fabric is reversible! — so I tore out the entire skirt front, including those pockets.

That’s also how I found that I didn’t like the look of topstitching on this fabric. When I reassembled the dress, I inserted the pockets entirely by hand. The openings are hemmed with a tiny prick-stitch (above) and the pockets are whipped in place (below), picking up only a few threads of the fabric with each stitch. The pockets on my husband’s Indian garments are hand-stitched like this, and he’s never torn out a pocket yet, so this method of construction seems to be fairly sturdy.

Only tiny stitches are visible on the outside of the dress:

After the pockets were attached, only the hems remained. This pattern has shaped facings along the edges of the skirt slits. This is the kind of thoughtful detail that provides the perfect finishing touch. Again, rather than topstitching, I hand-stitched these facings and the bottom hem of the dress using a tiny blind hem stitch. I never feel like I’ve really “sewn” something unless I’ve done some hand stitching on it. Between the pockets and the hem I got to do plenty, changing thread colors as needed. However, if you prefer to avoid hand stitching, this dress can be entirely finished by machine if you actually follow the instructions.

Seeing the play of colors as I assembled the dress, especially inside at the pockets and hems, was one of the joys of this project. Planning the initial layout of the dress and deciding how the colors should fall was also fun. I favored the cooler side of the Rainbow Check cotton, but the fabric has plenty of warm colors, too. The possibilities are pretty much endless. Even if every one of you makes a Damn Good Rainbow dress (and you should!) they would all be different.
Between the pleasure of working with this fabric, and the great pattern from Forest and Thread, this was the most enjoyable sewing project I’ve made in a long time.

It’s beautiful!